Thermal Pads

Right Thermal Pads Can Prolong the Life of a Graphics Card

Thermal Pads

A graphics card is one of the most important components of a gaming PC, but it also generates a lot of heat during operation. To prevent overheating and damage, a graphics card needs proper cooling, which involves not only a fan and a heatsink but also thermal pads.


What are thermal pads and why are they important?


It is a thin sheets of material that are used to transfer heat between two surfaces. They are often used in electronic devices to dissipate heat from hot components, such as processors and graphics cards.


What do they do?

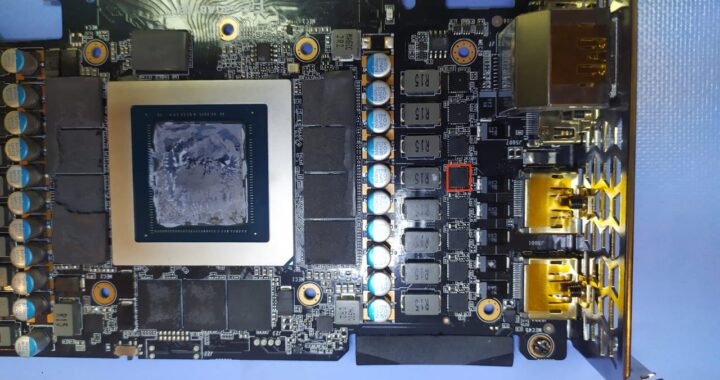
It help transfer the heat to the copper heatsinks in GPUs as the VRAMs, VRMs, and even the MOSFETs (in some cases) don't generally interact with the copper heat spreader as the main die would (the main GPU core/chip) with thermal paste, since there's always a space between them¹. Thermal paste is a semi-solid substance that is used to fill the tiny air gaps that are left behind when the heatsink sits on the processor or any other chip.

What is the use it?

It is generally used for components that generate lesser heat compared to a CPU, which include memory chips, VRM, motherboard chipset/northbridge/southbridge or Platform Hub Controller (PCH), or other ICs. They are also used in consoles, game stations, and some laptops where the CPU or GPU is relatively less powerful and generates lesser heat compared to faster processors used in computers. They are also great for DIY cooling for routers, repeaters, and other heat-generating components.


Why choose the right thermal pads?

Choosing the right thermal pads can prolong the life of a graphics card by ensuring optimal heat transfer and preventing thermal throttling, which is when the performance of the graphics card is reduced to lower its temperature. Thermal throttling can cause stuttering, lagging, and reduced frame rates in games, which can affect the gaming experience.


How to choose the right thermal pads for your graphics card?

There are several factors to consider when choosing thermal pads for your graphics card, such as:


Thickness

The thickness of the thermal pad should match the gap between the component and the heatsink. If the thermal pad is too thick, it can crush the component under pressure or cause an uneven board where some parts may interact with the heat spreader and some won't. If the thermal pad is too thin, it may not fill the gap and leave air pockets that reduce heat transfer. The thickness of thermal pads usually ranges from 0.5mm to 3mm.

Thermal conductivity

The thermal conductivity of the thermal pad measures how well it can transfer heat from one surface to another. The higher the thermal conductivity, the better the cooling performance. However, higher thermal conductivity also means higher prices and lower flexibility. The thermal conductivity of thermal pads usually ranges from 1 W/mK to 20 W/mK.

Adhesiveness

Some thermal pads are self-adhesive, which means they have a sticky layer on both sides that can attach to the component and the heatsink without any glue. This makes them easier to apply and remove, but they may also leave some residue behind. Non-adhesive thermal pads require some glue or tape to secure them in place, which can be more difficult to apply and remove, but they also leave no residue behind².

Size

The size of the thermal pad should match the size of the component that needs cooling. If the thermal pad is too large, it can overlap with other components or parts of the board which may cause short circuits or interfere with airflow. If the thermal pad is too small, it may not cover the entire surface of the component and leave some hot spots that reduce the cooling efficiency. The size of thermal pads usually ranges from 10mm x 10mm to 100mm x 100mm².


How to apply thermal pads to your graphics card?


Before applying thermal pads to your graphics card, you need to prepare some tools and materials, such as:


- Screwdriver

- Pair of tweezers

- Pair of scissors

- Some alcohol wipes

- Paper towels

- Pair of gloves


Then you can follow these steps:


Step 1

Turn off your PC and unplug it from the power source. Remove the side panel of your PC case and locate your graphics card. You may need to unscrew some screws or release some clips to remove them from the PCIe slot. Be careful not to touch any metal parts or components on the graphics card or the motherboard.

Step 2

Place your graphics card on a clean and flat surface. Use a screwdriver to remove the screws that hold the fan and the heatsink to the graphics card. Gently lift the fan and the heatsink from the graphics card and set them aside. You may need to twist or wiggle them slightly to break the seal of the old thermal paste or pads.

Step 3

Use some alcohol wipes and paper towels to clean the old thermal paste or pads from the graphics card and the heatsink. Make sure there is no residue left behind. You can use a pair of tweezers to peel off any stubborn thermal pads. Be careful not to damage any components or circuits on the graphics card or the heatsink.

Step 4

Cut your new thermal pads to fit the size of the components that need cooling, such as the VRAMs, VRMs, and MOSFETs. You can use a pair of scissors or a knife to cut them, but make sure they are sharp and clean. You can use the old thermal pads as a reference for the size and thickness, or measure them with a ruler or a caliper.

Step 5

Peel off one side of the protective film from the thermal pad and stick it to the component that needs cooling. Press it firmly and evenly to ensure good contact. Then peel off the other side of the protective film and stick it to the corresponding part of the heatsink. Repeat this process for all the components that need thermal pads.

Step 6

Apply a small amount of thermal paste to the center of the GPU core/chip. You can use a pea-sized, rice-sized, or X-shaped dot, depending on your preference and experience. Do not spread it with your finger or a tool, as this may create air bubbles or uneven coverage.

Step 7

Align the fan and the heatsink with the graphics card and gently place them on top of it. Make sure they are in contact with all the thermal pads and paste. Screw them back in place with a screwdriver. Do not overtighten them, as this may damage the components or cause uneven pressure.

Step 8

Reinstall your graphics card in your PC case and connect it to the power source and monitor. Put back the side panel of your PC case and plug in your PC to the power source. Turn on your PC and check if everything is working properly. You can use some software tools to monitor your graphics card’s temperature and performance.


Conclusion


Thermal pads are essential for keeping your graphics card cool and prolonging its life span. Choosing the correct pads for your graphics card depends on several factors, such as thickness, thermal conductivity, adhesiveness, and size. Applying thermal pads to your graphics card requires some tools and materials, as well as some patience and caution. By following these steps, you can improve your graphics card cooling and enjoy a better gaming experience.

Nvidia RTX 4090

Elevate Your Gaming and Video Editing Experience: A Step-by-Step Guide to Upgrading Your Graphics Card

Upgrading your graphics card is a great way to boost the performance of your computer, especially when it comes to gaming and video editing. In this article, we'll take a look at the steps involved in upgrading your graphics card, and what you need to consider before making the switch.

Step 1: Research Your Compatibility and Budget

Before you start shopping for a new graphics card, it's important to do some research to ensure that your computer is compatible with the card you have in mind. Check your computer's manual or specifications to see what type of graphics card slot you have, as well as the power supply and cooling capabilities of your computer. Also, determine your budget for the upgrade, as graphics cards can range in price from less than $100 to more than $1,000.

Step 2: Remove the Old Graphics Card

Once you've chosen a new graphics card and have it in hand, it's time to remove the old card. First, turn off your computer and unplug it from the power source. Then, open your computer's case and locate the existing graphics card. Gently disconnect any cables or connectors, and remove any screws or brackets holding the card in place. Carefully lift the card out of the slot and set it aside.

Step 3: Install the New Graphics Card

To install the new graphics card, start by following the manufacturer's instructions. First, ensure that any required power cables are connected to the card. Then, gently insert the card into the slot, being careful not to damage any of the components. Secure the card in place with screws or brackets, and reconnect any cables or connectors that you disconnected from the old card.

Step 4: Update Your Drivers and Settings

Once your new graphics card is installed, it's important to update your computer's drivers and settings for optimal performance. Visit the website of the graphics card manufacturer to download the latest drivers and software for your card. You may also need to adjust your computer's settings, such as screen resolution and refresh rate, to get the most out of your new card.

Step 5: Consider Upgrading Your Power Supply

If your new graphics card requires more power than your existing power supply can provide, you may need to upgrade your power supply. A power supply upgrade can ensure that your computer has enough power to run all of its components, including the new graphics card.

Step 6: Test Your New Graphics Card

Before you start using your computer again, it's important to test your new graphics card to ensure that it's functioning properly. Start by turning on your computer and checking that your display is working correctly. Then, run some benchmarks or games to test the performance of the new card. If everything seems to be working well, you can enjoy your upgraded experience.

In conclusion, upgrading your graphics card is a great way to improve the performance of your computer, especially for gaming and video editing. By following the steps outlined above, you can ensure a smooth and successful upgrade, and get the most out of your new graphics card.

Graphics Card Problems

Common Graphics Card Problems and How to Fix Them

Graphics cards are an essential component of any gaming or graphics-intensive system. However, like any other electronic component, graphics cards are prone to problems. If you are experiencing issues with your graphics card, you are not alone. In this article, we will discuss some common graphics card problems and how to fix them.


Common Graphics Card Problems -- Overheating:

Graphics cards generate a lot of heat, and if they get too hot, they can cause performance issues or even damage the card. Overheating can be caused by poor ventilation, dust build-up, or an inadequate cooling system. This is one of the common graphics card problems. To fix this issue, you can try the following:

- Clean your graphics card: Dust build-up can obstruct airflow and cause overheating. Use compressed air or a soft brush to remove dust from the graphics card.

- Improve ventilation: Make sure your computer has adequate ventilation. If your computer case has a fan, make sure it is working correctly and positioned to blow cool air over the graphics card.

- Upgrade your cooling system: If you have a high-end graphics card, you may need to upgrade your cooling system. You can install additional fans, replace the stock heatsink and fan with an aftermarket solution, or consider liquid cooling.


Driver problems:

Drivers are software programs that allow your operating system to communicate with your graphics card. If your drivers are outdated, corrupt, or incompatible with your system, you may experience graphics issues. To fix this issue, you can try the following:

- Update your drivers: Check the manufacturer's website for the latest drivers for your graphics card. Download and install the latest drivers, and then restart your computer.

- Roll back your drivers: If you recently updated your drivers and are experiencing issues, you can try rolling back to a previous version. Go to Device Manager, right-click your graphics card, and select Properties. Then, click the Driver tab and click Roll Back Driver.

- Uninstall and reinstall your drivers: If updating or rolling back your drivers doesn't work, you can try uninstalling and reinstalling your drivers. Use a program like Display Driver Uninstaller to remove your old drivers completely, and then reinstall the latest drivers.


Artifacting:

Artifacting is a graphics issue that causes abnormal visual artifacts, such as lines, dots, or squares, to appear on your screen. Artifacts can be caused by overheating, overclocking, or a defective graphics card. To fix this issue, you can try the following:

- Lower your graphics settings: Overclocking your graphics card can cause artifacts. Lower your graphics settings and see if the issue persists.

- Check your cables: Loose or damaged cables can cause artifacts. Check your cables and make sure they are secure and undamaged.

- Replace your graphics card: If none of the above solutions work, you may need to replace your graphics card.


In conclusion, graphics card problems can be frustrating, but many of them are fixable. If you are experiencing issues with your graphics card, try the solutions outlined in this article, and if all else fails, contact Graphics Card Repairs for assistance and we will resolve it for you.

Graphics Card

Graphics Card Maintenance: Why It’s Important!

Graphics cards are a critical component of any modern PC, providing the horsepower necessary to run games, video editing, and other demanding applications. However, they require regular maintenance to keep them running optimally. In this article, we'll discuss the importance of regular graphics card maintenance, including the need to replace thermal paste, clean the cooler fins, and check thermal pads.

Why Graphics Card Maintenance is Important

Over time, dust and debris can accumulate inside your computer case and on your graphics card's cooling system. This can cause your graphics card to overheat, resulting in reduced performance, system instability, and even hardware failure. In extreme cases, overheating can cause damage to the GPU, memory chips, and other components on the card. To prevent these issues, it's essential to perform regular graphics card maintenance.

Thermal Paste Replacement

One of the most critical maintenance tasks for a graphics card is the replacement of thermal paste. Thermal paste is a compound that sits between the GPU and the heatsink to help transfer heat away from the chip. Over time, the thermal paste can dry out and lose its effectiveness, reducing the cooling efficiency of the GPU. In some cases, the old thermal paste can even cause overheating, leading to hardware damage.

For those who use their graphics card for mining, the thermal paste should be replaced every six months. In other scenarios, the thermal paste should be replaced every two years. Replacing thermal paste is a simple process that involves removing the heatsink from the GPU, cleaning off the old paste, applying a new layer, and reattaching the heatsink.

Cleaning the Cooler Fins

Another important aspect of graphics card maintenance is cleaning the cooler fins. As mentioned earlier, dust and debris can accumulate inside the graphics card's cooling system, leading to reduced cooling efficiency. This can cause the GPU to overheat and result in performance issues. Cleaning the cooler fins can help restore the cooling efficiency of the GPU and prevent overheating.

To clean the cooler fins, first, remove the graphics card from the PC case. Use compressed air or a soft brush to gently remove the dust from the fins. Be careful not to damage the fins, as this can reduce cooling efficiency. Once the fins are clean, reattach the graphics card to the PC.

Checking Thermal Pad Consistency

Thermal pads are used to transfer heat away from components other than the GPU, such as VRAM and power delivery components. Over time, thermal pads can dry out and lose their consistency, reducing their effectiveness in transferring heat away from these components. To ensure that your graphics card is running at its best, it's essential to check the consistency of the thermal pads regularly.

To check the consistency of the thermal pads, remove the heatsink from the graphics card and inspect the pads. If the pads are dry, cracked, or have changed in thickness, they should be replaced. In general, thermal pads should be replaced every year for better performance.


The Benefits of Regular Graphics Card Maintenance

Regular maintenance of your graphics card can provide several benefits, including:

  • Improved Performance: A clean and well-maintained graphics card can run faster and smoother, improving your gaming or application experience.
  • Extended Lifespan: By taking care of your graphics card, you can help extend its lifespan and avoid costly repairs or replacements.
  • Reduced Noise: A dusty or poorly-maintained graphics card may run louder than necessary, but regular cleaning can help reduce the noise level.


At Graphics Card Repairs, we can help you achieve proper maintenance for your graphics card at a low fee. Our experienced technicians can provide valuable insights and assistance to ensure that your graphics card is running at its best. Remember, regular maintenance is essential to keep your graphics card running smoothly and efficiently.

Conclusion

In conclusion, graphics card maintenance is an essential aspect of keeping your PC running smoothly. Replacing thermal paste, cleaning the cooler fins, and checking thermal pad consistency are all critical tasks that should be performed regularly to ensure optimal performance and prevent hardware damage. By following these simple maintenance tips, you can extend the lifespan of your graphics card and enjoy a smooth, reliable performance for years to come. And if you need professional maintenance services, Graphics Card Repairs is here to help.